A clean and functional faucet is essential for a hygienic and efficient kitchen or bathroom.
However, over time, mineral deposits, limescale, and grime can accumulate on the faucet head, affecting water flow and overall performance. That’s where proper cleaning techniques come into play.
In this comprehensive guide, we will walk you through step-by-step instructions on how to effectively clean your faucet head, restoring its shine and ensuring optimal water flow. Whether you’re dealing with a clogged or spray irregularities, we’ve got you covered. Let’s dive in and master the art of cleaning faucet and shower heads together!
Why Clean Your Faucet Head?

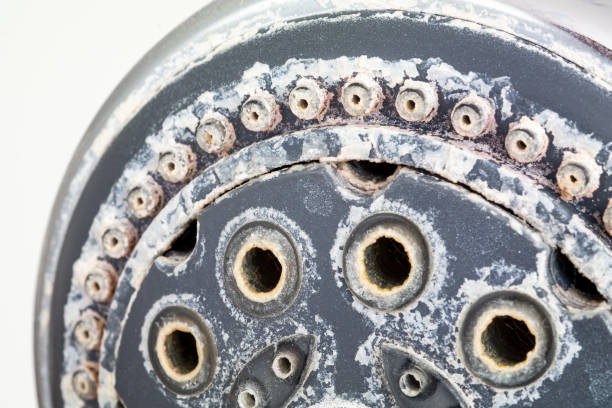
Before we delve into the cleaning process, it’s important to understand why regular faucet head cleaning is necessary. Over time, mineral deposits, limescale, and debris can build up on the aerator screen and inside the faucet head.
This can result in reduced water flow, uneven spray patterns, and even the potential for bacteria growth. By cleaning your faucet head regularly, you can:
Restore Water Flow

Removing the accumulated mineral deposits and debris allows water to flow freely, ensuring a steady stream without any obstructions.
Enhance Water Pressure
A clean faucet head improves water pressure, giving you a satisfying and efficient water flow for everyday tasks like washing dishes or hands.
Prevent Clogging
By removing debris and sediment, you reduce the likelihood of clogs in the faucet and shower head well, ensuring a consistent and uninterrupted water flow.
Maintain Hygiene

Bacteria and mold can thrive in the moist environment of a dirty faucet head. Regular cleaning helps eliminate these potential health hazards and ensures a clean and hygienic water source.
Gather Your Cleaning Supplies
Before you begin cleaning your faucet head, gather the necessary supplies. Here’s what you’ll need:
- Adjustable wrench or pliers
- Soft cloth or sponge
- White vinegar or lime scale remover
- Baking soda
- Toothbrush or small brush with soft bristles
- Old toothpick or pin
- Bowl or basin for soaking parts
- Towel or drying rack
Step-by-Step Cleaning Process
Now that you have your supplies ready, let’s dive into the step-by-step process of cleaning your shower | faucet head:
Step 1: Prepare the Faucet Head
Start by turning off the water supply to the faucet and kitchen sink. Look for the shutoff valve under the sink and turn it clockwise to stop the water flow. This prevents any accidental water leaks during the cleaning process.
Step 2: Remove the Faucet Head
Use an adjustable wrench or pliers to loosen the faucet head. Wrap a soft cloth or towel around the faucet head to prevent any scratches. Gently turn the faucet head counterclockwise until it loosens. Once loose, remove it carefully and place it on a clean surface.
Step 3: Disassemble the Faucet Head
Examine the faucet head and locate any removable parts such as the aerator screen or flow restrictor. Depending on your faucet model, these parts may be easily detachable or require additional tools to remove. Use your fingers or a small tool to unscrew or pry out these components.
Step 4: Soak the Parts in Vinegar Solution
Fill a bowl or basin with equal parts white vinegar and water. Submerge the disassembled parts, including the aerator screen and flow restrictor, in the vinegar solution. Allow them to soak for at least 30 minutes. Vinegar helps break down mineral deposits and limescale, making them easier to remove.
Step 5: Clean the Faucet Head Exterior
While the parts are soaking, you can clean the exterior of the faucet head. Moisten a soft cloth or sponge with vinegar or a mild cleaning solution and gently wipe down the surface.
Pay attention to any stubborn water stains, or grime buildup. For particularly tough stains, create a paste by mixing baking soda with water, apply it to the affected areas, and scrub gently with a toothbrush or small brush.
Step 6: Scrub and Rinse the Soaked Parts
After the parts have soaked for the recommended time, take them out of the vinegar solution. Use a toothbrush or small brush with soft bristles to scrub away any remaining debris or mineral deposits. Rinse the parts thoroughly under running water to remove any vinegar residue.
Step 7: Reassemble and Reinstall the Faucet Head
Once the parts are clean and dry, reassemble them in the correct order. Ensure the aerator screen and flow restrictor are properly aligned and securely attached. Carefully reinstall the faucet head by turning it clockwise until it tightens. Use an adjustable wrench or pliers to give it a final gentle twist, being cautious not to overtighten.
Step 8: Test and Check for Leaks
Turn on the water supply and test the well clean a faucet head, to ensure proper water flow and no leaks. If you notice any leaks, make sure the faucet head is tightly secured. If the problem persists, consider replacing worn-out or damaged parts.
Maintenance Tips for a Clean Faucet Head
To keep your faucet head clean and in optimal condition, here are some maintenance tips:
Regular Cleaning

Make faucet head cleaning a part of your regular cleaning routine. Aim for at least once every few months or more frequently if you notice reduced water flow or spray irregularities.
Avoid Harsh Chemicals
When cleaning, stick to mild cleaning solutions like vinegar or baking soda. Avoid using abrasive cleaners or harsh chemicals that may damage the faucet finish or rubber gaskets.
Preventative Measures
To minimize mineral deposits and limescale buildup, consider using a water softener or installing a filtration system. This can help prolong the time between cleanings.
Wipe After Use
After each use, wipe down the faucet head with a soft cloth or sponge to remove any water spots or residue. This quick wipe down will help the faucets maintain its cleanliness and shine.
Address Leaks Promptly
If you notice any leaks or dripping from the faucet head, address the issue promptly. Leaks can lead to water waste and potential damage, so it’s important to have them fixed or replace faulty parts.
Conclusion

A clean faucet head is essential for optimal water flow, hygiene, and overall functionality. By following the step-by-step cleaning process outlined in this guide and incorporating regular maintenance, you can ensure your faucet head remains clean, efficient, and durable.
Remember, proper cleaning and maintenance not only enhance your kitchen faucet head’s performance but also contribute to a healthier and more enjoyable experience in your kitchen or bathroom. So, roll up your sleeves, gather your cleaning supplies, and give your faucet head the attention it deserves for a sparkling and smooth-flowing water source.


